If you would like to contribute improvements to any placefile on this system, please email me.
Guide to creating satellite placefiles
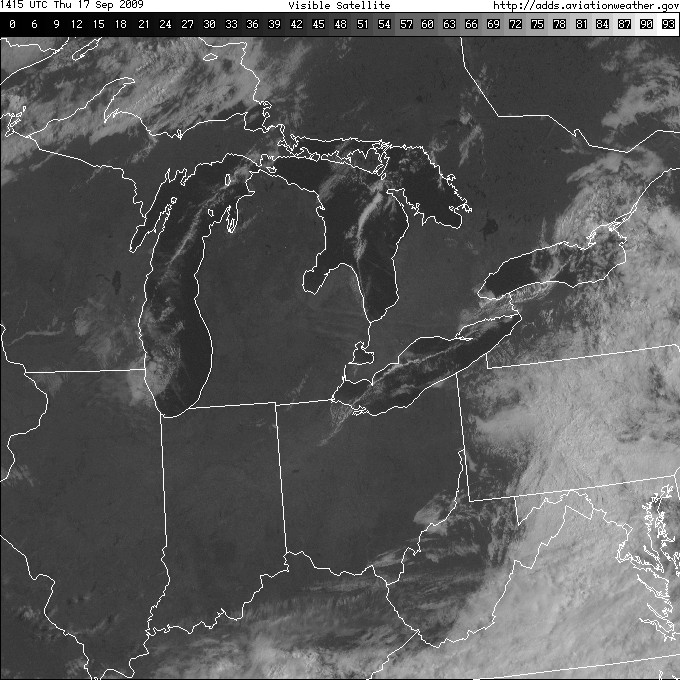
We will use DTW (Eastern Midwest) in this tutorial.
Image Preperation:
Step 1: Copy a sample image to your computer. Grab the the image from: http://adds.aviationweather.gov/data/satellite/latest_DTW_vis.jpg. In this example, I save the file as C:\dtw_vis.jpg
Step 2: Open the file in a paint program (photoshop, gimp).
Q. Why does the image need to be divided up? Why can we just place it as one image with each corner as a lat/lon coordinate?
A. Due to the "flat" display of GRL3 (The earth isn't curved) and the "curved" display of the satellite image, you will see quite a bit of distortion if you tried to may the entire image to 4 coordinates. Dividing the image up into much smaller pieces (the triangles), reduces the noticeable distortion to almost zero.
Step 3: Draw lines to divide the image up into a 4x4 grid. These lines will be used a guide to help us tune the lat/lon coordinates.
The satellite image starts 37 pixels down, so the coordinates will account for not showing the color key and URL information at the top. Divide the image up into a grid of 4 x 4, evenly spaced. In this image, the horizontal lines should be at Remember to start at the top of the map section of the image for your first line.
Our image size is 680x680. The image we want to show is 680x643. So we'll divide up 680x633 evenly.
Vertical Lines:
0, 170, 340, 510, and 680 pixels from the left.
Horizontal lines:
37, 197 , 358 , 519 , 680 pixels from the top.
Your image should look like this.
WHat we have now are 25 points where the lines meet. These are the 25 lat/lon coordinates that you will need to insert later. But we still need to divide the image up into triangles in our guide image. Draw a diagonal line going from upper right to lower left across all of the grid lines. You should be able to draw one line line across the entire image and have it intersect each point along the way.
Your image should now look like this:
I'll add in numbers to each intersection. These numbers will be referred to the map points. We have 25 points.
We also need to tell GRL3 where in our image these coordinates are located. GRL3 placefiles use a system where the top of the displayed image has a coordinate of 0,0 , the upper right is 1,0 , the lower left is 0,1 , and the lower right is 1,1. Everything inbetween is a fraction of 1. For our east-west coordinates it is easy since the image is evenly divided into 4 parts, the markers are 0, .25, .50, .75, and 1 on the veritical lines. Since the horizonal lines started 37 pixels down, it's different. They are 0.054, 0.294, 0.529, 0.764, and 1. The good news is that these don't need tweaked and you can use them as is. So displaying in the image placement in red, our map looks like this now. These numbers will be used later in the placefile.
The white satellite outlines of the lakes and state lines is mostly all you have for lining up the images correctly. It's easiest to start with a triangle that has these reference points in each part of the image. Once you get the first triangle lines up, the next triangle you do should touch that first one. This will help you to have them all lined up better. As the process goes on and more triangles are added, you find yourself going back and tweaking coordinates you already put in it.
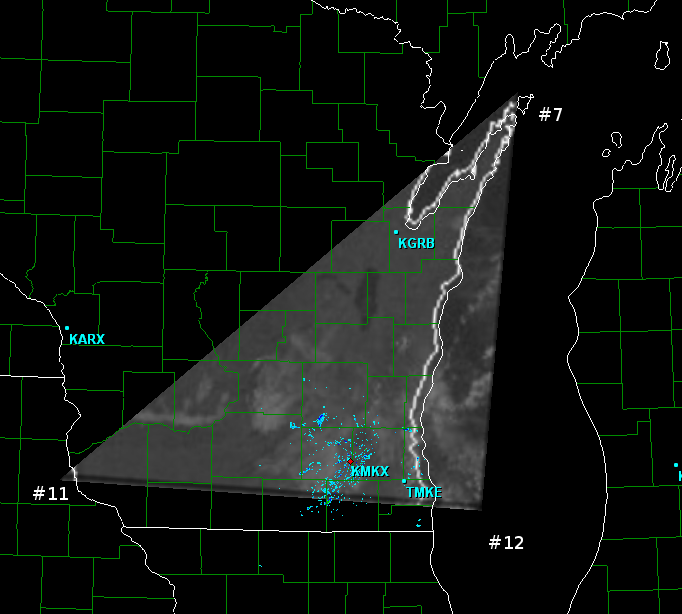
Let's start with the triangle at the SE part of Wisconsin, which is outlined by map points 7, 11 and 12.
Open up GRL3 and go to a radar site that has this triangle in view, such as Milwaukee. Place your mouse pointer as close to the point 7 as you can eyeball on GRL3. It should be just to the left of where the land in Wisconsin NE of Green Bay ends. Since a screen capture doesn't show the mouse pointer, I put a red dot next to where my mouse was. In the lower right of the GRL3 window, it will show the lat/lon coordinates of this point. So tentavitely, point 7 has a lattitude/longitude coordinate pair of 45.45 and -86.91. There is no need to go beyond a hundreth of a decimal.
Now do the same process for points 11 and 12.
11: 42.81, -91.21
12: 42.68, -87.36
7: 45.45, -86.91
We also need to enter the image placement numbers for these points. Those are the red numbers on the map. Point 11 has placement coordinates of 0.0 and 0.529. Point 12, 0.25 and 0.529. Point 7, .025 and 0.294.
Now we will enter these into the placefile and see what it looks like. Copy this into a .txt file on your PC:
Title: Test Satellite Tutorial
Refresh: 999
Threshold: 999
Image: C:\dtw_vis.jpg
45.45, -86.91, 0.25, 0.294 ;Point 7
42.81, -91.21, 0.0, 0.529 ;Point 11
42.68, -87.36, 0.25, 0.529 ;Point 12
End:
Save this as test.txt. Then load it as a placefile into GRL3, and check both boxes to left of the placefile name. You should see this:

Tip: If the placefile manager shows the placefile as red, right click on the name of it and will tell you what the error is.
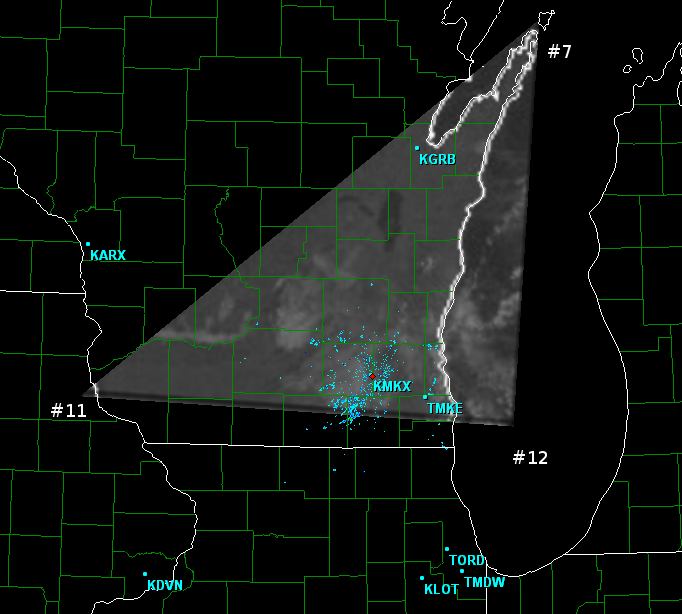
Well it wasn't a bad estimate of coordinates. It looks like #11 needs to go a smidgen to the west. #12 needs to go south and east a little, and #11 needs to go south a little.
Title: Test Satellite Tutorial
Refresh: 999
Threshold: 999
Image: C:\dtw_vis.jpg
45.45, -86.95, 0.25, 0.294 ;Point 7
42.81, -91.24, 0.0, 0.529 ;Point 11
42.63, -87.36, 0.25, 0.529 ;Point 12
End:
Save the file, close and reload GRL3. We now see this:
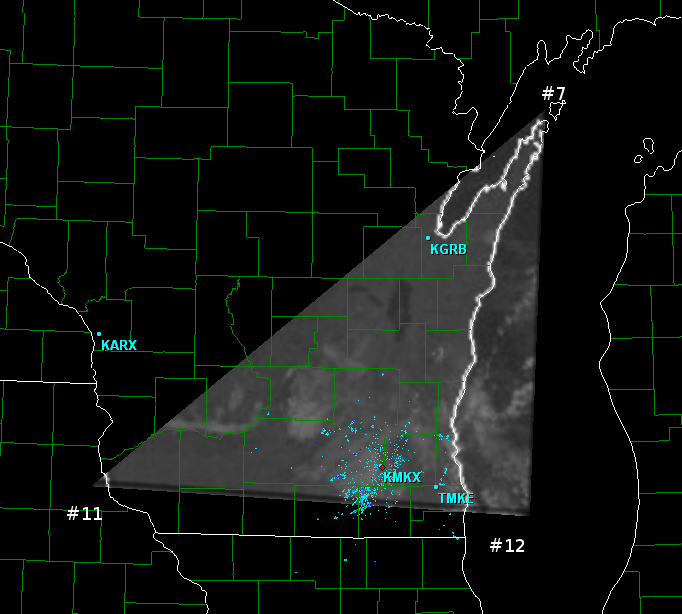
Still needs work. #11 looks great, though it will probably need adjusted once the other triangles using it are added. Not enough of the IA/WI border is shoing to know if it's really in the best place. #12 looks lined up going N-S but needs to move east some more, and #7 needs to still come more south.
Title: Test Satellite Tutorial
Refresh: 999
Threshold: 999
Image: C:\dtw_vis.jpg
45.37, -86.95, 0.25, 0.294 ;Point 7
42.81, -91.24, 0.0, 0.529 ;Point 11
42.63, -87.26, 0.25, 0.529 ;Point 12
End:
Looks good! #12 needs to go east a little, and #7 needs to go west a little.
Title: Test Satellite Tutorial
Refresh: 999
Threshold: 999
Image: C:\dtw_vis.jpg
45.37, -87.00, 0.25, 0.294 ;Point 7
42.81, -91.24, 0.0, 0.529 ;Point 11
42.63, -87.21, 0.25, 0.529 ;Point 12
End:
And it's done! Now just add more triangles in the same way to the placefile. You'll find yourself fine tuning points you already added as you go on, just remember to change *all* the triangle entries that contain that point. For example, Point #13 is part of 8 different triangles. The next triangles logically to add would be 6-7-11 and 7-8-12, since you only have to figure out one new coordiante each for them.
Happy placefiling! Please share your results with everyone!